Showing posts with label How-to's. Show all posts
| 1 comments ]

Almost every person in this world should have come across email spam. Spam is nothing but emails which link to malicious websites and most of those websites are inappropriate for children. Spam will fill up your email space and can be irritating. The human tendency is we regret after the damage has occurred and we don't try to prevent the damage. Though many email service providers say to prevent spam mails, still spam reach your inbox. So, the only way to decrease spam is manually. Follow this simple 3 golden rules in everyday of your cyber life to prevent spam.

  • Think twice when subscribing to newsletters and feeds. Only subscribe when you are confident that the site will keep your personal information safe. Check the URL of the sites before submitting your email address because spammers will use templates (replicas) of popular websites to trap you.
  • Don't click on the "Unsubscribe" in the spam mails. What you think is if you unsubscribe then you don't receive emails from them. But there is evil trick used by spammers here. Whenever you unsubscribe from spam mails, spammer will confirm that you are reading spam mails and hence will forward your email ID to other spammers. Spam will increase when you try to decrease.
  • Don't expose your identity to others. Don't leave your email in comment sections of websites and forums where your email ID is visible to everyone.


If you are already facing spam then follow the above steps to prevent spam to increase. Following the above steps will prevent further damage. Don't go with traditional ways to deal spam - Handle with Care.


Related links :

Spamexperts

Comodo Antispam

Mailwasher

Spamfighter

Ultrafunk


Like this post, then please subscribe here. You can also subscribe through email, so that these posts are directly mailed to your inbox. Any comments and suggestions on this topic are always welcome.

| 0 comments ]

What it FAT?

FAT is abbreviation of File Allocation Table. It is one of the many file systems used in O.S. FAT is one of the oldest file system available. FAT32 and NTFS are the later versions and have more features and enhancements when compared with FAT.


Why I have to convert FAT/FAT32 to NTFS?

NTFS file system has many significant improvements over the older file systems. Let us those features that NTFS has and FAT doesn't have. In FAT16 maximum size of a disk is 2GB, and that in FAT32 is upto 32 GB. Whereas in NTFS you can create a volume of size upto 2TB. NTFS allows disk compression, encryption, Disk quotas. It has improvements in areas of Security, recoverability and performance of Disk. 


How to convert FAT/FAT32 to NTFS?

Win XP offers a simple command to convert FAT and FAT32 to NTFS. This is the simplest way to convert FAT/FAT32 to NTFS. No software needed, and no partitioning of disk. Just a simple command to convert FAT/FAT32 to NTFS without losing the data.

1. Open Command Prompt. Click Start and select RUN, type in cmd and hit enter.

2. In the command prompt type : convert drive_name: /fs:ntfs. (Eg : convert E: /fs:ntfs )


In this way you can convert FAT and FAT32 to NTFS.

Note : This command will not work with the drive on which Operating system is loaded.


Like this post, then please subscribe here. You can also subscribe through email, so that these posts are directly mailed to your inbox. Any comments and suggestions on this topic are always welcome.

| 0 comments ]

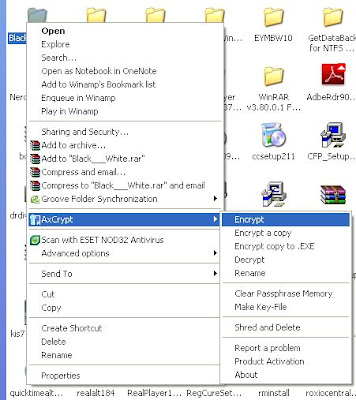
Encrypting important files and folders is what everyone needs. Many don't know that Windows XP and Vista provides these features. To learn on how to encrypt files in XP, click here and to encrypt files in Vista, click here. These encryption methods are rather old and are not so flexible. Today we have many free alternatives by which we can encrypt files safely. AxCrypt is one such software and more importantly it is an open source. Today you gonna learn on how to encrypt files and folders using AxCrypt.


Encrypting files and folders using AxCrypt :

1. Download AxCrypt from here and install it.

2. Now browse for file or folder that you want to encrypt.

3. Right-Click on the file or folder and select Encrypt.


4. Now you'll be prompted to enter password, Enter the password and click OK. Now your file is encrypted.

5. Whenever someone tries to open that folder a dialog box opens asking for the password and it will be opened if the password supplied is correct. This way your files are encrypted.


AxCrypt also provides some more additional functionality like shredding and deleting files and more. So download AxCrypt now.


Like this post, then please subscribe here. You can also subscribe through email, so that these posts are directly mailed to your inbox. Any comments and suggestions on this topic are always welcome.

| 3 comments ]

Many know Winamp as the best audio player but only some know it as audio converter. Winamp not only converts audio files but also converts videos into audio files. Winamp convert any audio file it plays into wma, wav, mp3 and more (AC3, ACELP.net, CCITT A-Law, CCITT u-Law, DSP, DTS, GSM, IMA ADPCM, Microsoft ADPCM, Microsoft G.723.1). It converts winamp playable formats (almost all) into any one of these formats.

To convert with Winamp follow these steps.
1. Open Winamp.
2. Click ctrl+P or Options> Preferences from menu bar. This opens winamp preferences window.
3. Scroll down to select Output under plugins.


4. Now select Nullsoft disk writer and click configure.
5. New window opens and there under conversion select convert to format. Click on the button below.


6. This opens another window and there you can select the format you wish. Some formats have low quality settings only, so see for high quality settings under each format. For example, MP3 format has only 56 kbps has highest in winamp where as wma has upto 160 kbps and wav (uncompressed). Now close all the windows by clicking OK or close.

Now that you've set your player as converter, you can start converting now. Play any song you want to convert in winamp. When the song is playing (plays faster than normal) no output is heard because winamp is internally converting the file. By default it saves the converted files into My Music folder. You can change the output folder from the window that described in step4. In this way you can convert any audio or video file into the above listed output formats.

Note : I noticed flv is not being converted, so there may be some more files which winamp cannot convert. But winamp converts majority of its audio and video formats.

Like this post, then please subscribe here. You can also subscribe through email, so that these posts are directly mailed to your inbox. Any comments and suggestions on this topic are always welcome.

| 1 comments ]

Microsoft Outlook is major e-mail client used largely by corporate and business people. So it is necessary to know that we can recover the deleted emails from Microsoft Outlook. Let's quickly see how to deal with it.

Step By Step Procedure: (This works only for items hard deleted from Mailbox)
1) In left hand pane right click on the folder from which you want to recover mails e.g. Inbox
2) Goto Tools menu and check whether Recover Deleted Items is enabled or Grayed out.
3) If it is enabled click on it, you will notice screen similar to this…….


4) Select items which you want to recover and press Recover selected items(Middle button on top left corner) . These items will restore to their original location. That’s it………
5) If Recover deleted items is grayed out check this registry tweak……….
6) Close outlook client and all open windows, Goto Start-àRunàRegedit
7) In Registry Editor, navigate to the following registry key:
8) HKEY_LOCAL_MACHINE\SOFTWARE\Microsoft\Exchange\Client\Options
9) Screen similar to this:


10) Right click on options, select New Dword value and edit as DumpsterAlwayson


11) Double click on it and enter numeric 1 to enable the key.


12) Press ok and exit the registry editor.

Note: Make sure you are editing the registry correctly. Better to take backup of registry before editing.
13) Reopen Outlook for settings to take place (Recommended: Restart the system)
14) Now in outlook client Recover Deleted Items is enabled.
15) Follow the procedure from steps 3à4.
16) Iam sure this will help for you.

Like this post, then please subscribe here. You can also subscribe through email, so that these posts are directly mailed to your inbox. Any comments and suggestions on this topic are always welcome.

| 0 comments ]

Browser Hijacking has been a major threat in the present times. So though we are not yet affected by browser hijacking, we have to know the prevention of it to assure ourselves that we are on safe side. Before preventing a browser Hijack the following are signs for which you have to see whether your browser is hijacked or not.

1.First time you open and surf and then close the browser. The second time without your concern the browser automatically opens, even you try to close, multiple browser windows will be opened automatically.
2.Your Home Page is changed without your permission.
3.A pop-up says to install this software like "Antivirus 2009"...
4.Only some sites open and many don't, mainly security sites like symantec, Mcafee and more.
5.Too many Ads on your browser especially pop-ups.
6.New browser addons (toolbar) and icons installed on your browser without your concern.
7.Slow and sluggish system.

If you find more than two of above signs on your PC then take it from me, your browser is Hijacked. Since browser is the only door to the world of internet we've to make it strong and more secure that no one access your system and disturbs your privacy. Now-a-days online banking has been very popular it is must to secure our browser because with browser hijacking there is certain amount of risk involved in stealing your information. So if you find the above signs on your PC then start now to reduce the impact of browser hijacking.

Removing malicious software and removing browser hijack tools :
First and foremost thing you've to do is uninstall the browser addons by logging into safe mode. If you have any trouble logging into safe mode click here to see instructions on how to access safe mode.

  • Internet Explorer users : From Menu bar, Tools> Manage Addons> Enable or Disable addons.
Other than Internet Explorer, other browsers show strong resistance against browser hijacking. Browsers like Firefox, Opera and other it's tough to hijack them. So I suggest every Internet Explorer user to change your browser to Firefox or Opera.

Secondly, download and run TrendMicro HijackThis. After installing HijackThis, run it and select scan and save log file. After it completes scan it will save the log file in the same HijackThis folder.

Now click here to go to HijackThis log analysis site. Click Browse at the bottom of page and select the log file of HijackThis and upload it. Now you can see which items are infected and which are safe. Keep your analysis window open and do HijackThis scan and check the infected items and remove them.

Also scan the whole computer and mainly WINDOWS and Program files folders with updated antivirus by logging into safe mode. In this way you can remove the browser hijacking objects.

Preventing future browser attacks :
1. Download and install Spyware Blaster, click here to download. This adds thousands of malicious sites list to the restricted sites list of Internet Explorer and Firefox and also provides more protection to your browser.
2. Download and install K9webProtection and prevent unsafe websites. Actually this is a parental control software but this will be very helpful to you in blocking malware sites.

These two softwares are free and these two provide additional security to your computer apart from your routine antivirus and firewall.

Like this post, then please subscribe here. You can also subscribe through email, so that these posts are directly mailed to your inbox. Any comments and suggestions on this topic are always welcome.

| 0 comments ]

Today's malware is a big challenge for security products in removing them. Even the most recent versions fail at removing some rogue virus, trojans, spyware etc. If an antivirus fails at removing them we have to take that task of removing that virus manually. So let's see how to remove a rogue malware which is not removed by antivirus.

Scan your computer with your updated antivirus.It detects some malware and gives you option of cleaning, quarantining and deleting.When click on remove threats then antivirus first tries to clean that file, if it fails then it tries to quarantine that file if this also fails it tries to delete that file. At this point the robustness of antivirus comes out. Even then the antivirus couldn't remove the file then the best antivirus gives you option to delete that file on reboot and the worst antivirus leaves that file as it is and says virus cannot be removed. Actually the antivirus cannot remove the threats because the virus or spyware that is detected is running as process on your computer. Many big virus will run automatically as a process at the start of the computer. If this is the case then follow these instructions to manually remove detected virus.

1. Almost every antivirus program gives you some useful information when a threat is detected, that is it gives the path of infected file. If you cannot find the path of infected file then click the details button of the infected file and there you can find the path of the infected file.
2. Now copy and paste the paths all infected and cannot be removed files to a text file and name it as "infected" or what ever you wish.
3. Now restart your computer and select safe mode. If you have trouble in logging into safe mode then see here to fix safe mode problems.
4. Now open the "infected" text file that we've saved earlier.
5. Now copy and paste it in windows explorer and hit enter.


6. Delete the infected files and they will be deleted without any problem.

In this way you can remove almost any type of rogue antivirus or spyware which are not removed by antivirus,

Like this post, then please subscribe here. You can also subscribe through email, so that these posts are directly mailed to your inbox. Any comments and suggestions on this topic are always welcome.

| 0 comments ]

Apple iTunes player gives users a huge list of Radio stations according to genres. These iTunes Radio station streams are of bitrate ranging from 24 kbps to even 320 kbps. So these Radio stations stream high quality songs than compared to Yahoo Launchcast (click here for tutorial to save Yahoo Radio).

To save these streams we are going to use wmrecorder and RealPlayer 11.
Download and install wmrecorder and RealPlayer 11 (both are free). For more information on how to install wmrecorder click here.
After installing wmrecorder correctly, open wmrecorder and make sure ADA mode is selected.
For more information see this image.

Now let us see how to save these high quality streams to computer.
Step1 : Open iTunes player and select Radio tab.
Step2 : Now select the genre you love and double click on Radio station to play.
Step3 : When iTunes starts playing the song, wmrecorder will catch the stream URL and starts downloading. Now click stop record and exit record in WMRecorder.
Step4 : Now copy the URL given by WMrecorder. See here for more info.
Step5 : Open Internet Explorer and paste the stream URL and hit enter. This will open a site like this.
Step6 : Click Listen on top tab, this will start pls file to download to your computer.
Step7 : Now open the pls file RealPlayer and record the stream to your computer. To record just click record button in RealPlayer.

This will save iTunes Radio mp3 streams to your computer. Now you can listen your favourite songs anywhere & anytime for free.

Notes : If the URL given by WMRecorder is a stream (URL ending with mp3, aac...) then copy link and paste in your download manager to save stream to your computer.

Like this post, then please subscribe here. You can also subscribe through email, so that these posts are directly mailed to your inbox. Any comments and suggestions on this topic are always welcome.

| 0 comments ]

What are proxies?
Mainly proxies are of 3 types :

  • Transparent
  • High Anonymous
  • Anonymous
How to use Proxies?
  1. Go to this website samair.
  2. Click checked time, so that you use recently updated proxy servers.
  3. The proxy looks like this
  4. See which countries does that website (you want to access) allow to access that content, After knowing which country is allowed, see for IP addresses of those countries in the list and select those proxies whose Anonymity levels are anonymous and high-anonymous. I suggest not use those IP addresses whose ending will start with 31**, that is 3125, 3126, 3127... Because some websites don't allow using those proxies even they belong to that country.
  5. So now that you have selected the IP address (you are half-way done!), You have to insert that IP address into your browser (to complete this process).
  6. OK the IP address you've selected will be like this 206.64.92.16:8000. There are two parts in it, the first part before colon is the IP address and the second part after the colon is the port. Keep this aside for some time,
For Internet Explorer users :
  • Open Internet Explorer select Tools>Internet Options,
  • select connections tab, Under this select LAN settings
  • do changes as they are in this below image.
  • Don't check Bypass Proxy server for Local addresses. That's it you've done now access that restricted website, now you will be allowed.
For Firefox Users :
  • Open the browser
  • Select Tools>Options.
  • Select Advanced tab
  • Now select Network tab and then select settings under network tab.
  • Now select Manual configuration and insert the first part in first box and second part in second box. See below image for more assistance.
  • Check use this proxy for all protocols, Now access the restricted website and you will be allowed.
P.S : Dial-up and ADSL users cannot use proxies on IE and can use other browsers like Opera & Firefox.


How are Proxies useful for me?
Proxies are very useful when you to have something which is restricted to some countries only.
For example in this kaspersky post when you go to register for license it says sorry it's only for Malaysians. But by using Malaysian proxies you can get that Kaspersky free. Like this you can watch videos, songs, offers which are available to only one country.

Like this post, then please subscribe here. You can also subscribe through email, so that these posts are directly mailed to your inbox. Any comments and suggestions on this topic are always welcome.

| 0 comments ]

Everyone love music & want to have them on the go, on car... but you have to buy music for that. This is where the people back off & try the other ways for having music like limewire, torrents, rapidshare etc and everyone know that these steps are illegal and at sometime or the other they change and try to find a legal way for acquiring music.There are many websites that offer free music but they are of individual artists(most of the websites) and not the popular artists like Michael Jackson... There are some websites where you can listen to music free and some other websites offer music downloads free and legally. Here you go with latest trend of music destinations.

1.Listen free : Napster

Napster offers free music service only in the United States. So to listen to them you can use American proxies.

Rhapsody

Rhapsody also offers free music service only in United States. So to listen to them you can use American proxies.

There are numerous others on internet who offer listening to free songs. So just google them.

2.Download free : SpiralfrogSpiralFrog-745725

This service offers free music downloads and they apply DRM to the songs you download. These songs will expire every 30 days, so you have to renew the service for every 30 days. The renewal process is also free.

To download songs you have to register to it. During registration you can use proxies (U.S.A) I think. So just try registering without proxies. If this process doesn't allow you to download then try proxies. After registration you have to install their download manager and you can download music for free. You dont need to use proxies everytime.Proxies are required only at the time of registration.

QtraxQtrax

This free service is the new service which is intended to give benefits to the entire world. So at present only some countries are added and this service is coming to more countries soon. They offer DRM music free. You can find every popular song there. So start downloading today.

Drawbacks : All the songs that you download from above services are legal and are DRM applied songs. You can listen only on PC. You cannot transfer these to mp3players, ipod etc and you cannot burn these songs to CD or DVD.

Still there is a solution with me. With this solution you can burn, sync to ipods and unlimited access to your songs. If you want to know more about this leave a comment below, then only I can tell you how to remove DRM from the songs.

Like this post, then please subscribe here. You can also subscribe through email, so that these posts are directly mailed to your inbox. Any comments and suggestions on this topic are always welcome.

| 0 comments ]

To convert your video to 3GP or mp4 format & for a smooth playback on mobiles, I prefer you to convert it with quicktime player only, don't use super converter to convert into 3GP or mp4.
Let us start this tutorial.

step1 : Find the format of the source video.
If the video format is mov, qt, mpg, mp4, avi (make sure its not encoded with divx, xvid...) then skip to step3.
If the video format is other than the above mentioned i.e. flv,divx,rm... then follow step2.

step2 : Now you have to convert your video to the format understandable by the qtplayer(short form for quicktime player).Now we are using the Super converter to convert your video into qtplayer understandable format.If you don't have Super converter and quicktime player check down for their download links.
qtplayer understandable formats are, as mentioned above mov, qt, mpg, mp4, avi.
So now convert your video into mov format using Super.If you are beginner then these step are for you.
(i) Open super converter, amd drag and drop the source video into super converter.
(ii) Now in output container drop-down box select mov.
(iii) In video scale size box select no change and bitrate anywhere between 500-1000 kbps. In audio select sampling frequency 44100 and bitrate 96 kbps.
(iv) Right click on any blank area of super converter and select output file saving management. Select the folder you use most or any folder you wish, so that the videos will be saved in that folder that you remember.
(v) Now click encode button and the source video will be converted to mov format.
If you've done upto this half of the part is successfully completed.

step3 :
(i) Now go the folder where you saved the video and play video in qtplayer.
(ii) Now use ctrl+ E from keyboard or alternatively you can goto file menu and select Export.
(iii) A new window will be opened there. In the drop-down menu of Export select movie to 3G. Now click on Options button in the side. Check that the file format is 3GPP or 3GPP2 as per your mobile configuration. See that video is selected in next drop-down menu & video format H.263 & leave the rest of options as they are.
(iv) Now click OK, so the settings made will be saved and in the next window select Save and the video will be saved to 3GP format.

You can use any format in step2 not only the mov but see that it should be played in qtplayer. You may get errors when converting with Super. Then you select other format like mpg etc.

Download: Super
QuicktimePlayer

Like this post, then please subscribe here. You can also subscribe through email, so that these posts are directly mailed to your inbox. Any comments and suggestions on this topic are always welcome.

 
ss_blog_claim=6e1f28d931f116bb4571b3d0e6432208