For the last 7 days we've seen tutorials on how to create website for free. If you follow the steps I said then you should have a running website by now. I followed what I said and see my new website here. In this way you can create a good looking website.
Today we'll see how to setup wordpress. So I am directly going into this topic without wasting any time.
Step 1 :
1. Login to your member account at 000webhost from here (If you don't have an account signup here).
2. After logging in, click on CPanel. Under the Files tab you find View FTP details icon. Click on it.

3. Now save those FTP details onto your system.
Step2 :
In yesterday's post I told you to download an FTP program preferably Filezilla. If you haven't downloaded Filezilla yet please download it from here and install it.
1. Download wordpress from here and extract the contents to a folder.
2. After installing Filezilla, run it from the start menu or from desktop as you wish.
3. Now enter the FTP details you saved earlier into Filezilla (See image). Click on Quickconnect.

4. Wait until Filezilla successfully establish connection successfully.
5. In filezilla the left side part represents the local computer and the right side part represents the database. Browse on to the wordpress folder in Filezilla and drag and drop the contents of wordpress folder on left to public_html folder on right. This will upload the files from your computer to the database. This will take around 5 to 10 minutes.


6. Now here is a small thing you have to do. Browse to extracted wordpress folder and open the file wp-condig-sample.php with Notepad. You'll find the following code :
// ** MySQL settings - You can get this info from your web host ** //
/** The name of the database for WordPress */
define('DB_NAME', 'putyourdbnamehere');
/** MySQL database username */
define('DB_USER', 'usernamehere');
/** MySQL database password */
define('DB_PASSWORD', 'yourpasswordhere');
Remember the information when you've created database. In the last post we've seen how to setup database and at the end I told you to save the info. Now change those things to the info. you've received when you've created the database. For more info on this details, click here.
e.g :
// ** MySQL settings - You can get this info from your web host ** //
/** The name of the database for WordPress */
define('DB_NAME', 'a8706405_DB1');
/** MySQL database username */
define('DB_USER', 'a8706405');
/** MySQL database password */
define('DB_PASSWORD', 'mypass'); // The actual details vary according your account//
7. After giving the details of your database save that file as wp-config.php.
8. Now upload this file into public_html folder using Filezilla.
That's it the main part of creating site with wordpress is over. Now open your browser and go to http://www.yourdomain.co.cc/wp-admin/install.php where yourdomain.co.cc will be your domain name you've created. Complete the setup process and wordpress will be installed on to your website. It's very easy and is a matter of 10 mins to install wordpress.
Yesterday we've seen how to setup your domain on your hosting service here. Today we'll see how to create a database on your hosting service. We use a database to install cms services for your website. Let us see how to create a database.
1. Login to 000webhost from here (If you don't have an account at 000webhost you can get it for free from here). After you login you'll see a list of your domains. Now, click on Go to CPanel.

2. In the next page you see a list of services and tools. Under the tab Software/Services you find MySQL icon. Click on it.

3. In the next page enter the details and create a database.

If everything goes well you'll see a message that the database is successfully created. Note down the information you receive about your database. We'll use this information in our next tutorials.
Download and install ftp program like Filezilla. We use this software to upload the files to your database. Tomorrow we'll see how to setup wordpress on you site.
Like this post, then please subscribe here. You can also subscribe through email, so that these posts are directly mailed to your inbox. Any comments and suggestions on this topic are always welcome.
Avira Antivir Premium edition provides top quality protection against every type of malware. It includes anti-virus, anti-spyware, anti-rootkit and also protects from other malicious software. It lacks only a firewall. But we have powerful firewalls such as Comodo etc. So I recommend you use Firewall+Avira Antivir Premium 181 days free if you have an internet connection.
To get Avira Antivir Premium edition free for six full months then follow these steps :
1. Click here to go to promotion page.
2. Fill in the form. It is in German, so see the image below for English translation.

3. After filling the form click on button Lizenz anfordern.
4. Now go to your email inbox, you'll receive an email from Avira. Click on the link in the email.

5. You'll be forwarded to Avira site, from there you can download the license key (In the image below the download link to the license key is marked in red).

Download Avira Premium edition 8 from here. During installation use the license key and get the ultimate protection of Avira. [via WongSK]
Like this post, then please subscribe here. You can also subscribe through email, so that these posts are directly mailed to your inbox. Any comments and suggestions on this topic are always welcome.
Yesterday we've seen how to get a free domain name and free web-hosting. I continue this tutorial by assuming that you've signed up to CO.CC as your domain name and 000Webhost for your web-hosting. Today we will see how to setup the server settings of your web-host onto your domain. To add server settings on your domain follow the following steps :
Step1 : Giving your domain name to the web-hosting service.
1. Sign into your 000Webhost members account from here (If you don't an account signup here).
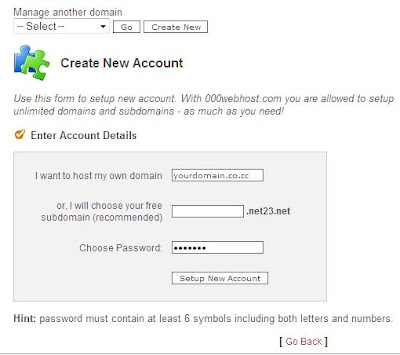
2. Click on create new.

3. Now in the next page enter your domain name that you've created, such as yourdomain.co.cc. Give a password and click on Setup new account tab.

In this way you can successfully setup your domain name on your web host.
Step2 : Add web-hosting server details onto your domain service.
1. Sign into your CO.CC account (If you don't an account signup here).
2. After signing in you will be shown the domain name which you registered earlier. Now click on that domain and click on Setup tab.
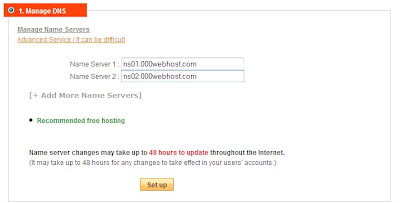
3. Now select the tab Manage DNS, Now enter these two sever names
ns01.000webhost.com
ns02.000webhost.com
into the dialog boxes Name server 1 and Name server 2 one by one. After entering the sever names click on Setup tab below. The settings will be saved and wait for 48 hours to ensure that the server settings of your web-hosting will be saved correctly.

That's it for today. Now wait until tomorrow and in between also check whether your domain is set properly by typing your domain name in web browser. Tomorrow we'll see how to make your site ready to publish your ideas.
Like this post, then please subscribe here. You can also subscribe through email, so that these posts are directly mailed to your inbox. Any comments and suggestions on this topic are always welcome.
Do you wanna share something with others? Do you think that you have something valuable, which when shared can influence others or benefit others? Then the powerful way to send your thoughts to public is through a blog or a website. I say it is a powerful media because it has no geographic limits. You can send you notions around the globe. If you are interested in creating a website then this will be a good news for you. I wanna guide you on how to start a website with free tools and how to earn money through it. Let us start this lesson right from the scratch. Don't worry even if you don't know anything. I'll teach you in a simple manner so that even a novice can understand it easily.
We see that there are 3 basic things one has to know before starting a website. They are :
1. A domain name - Domain is something which is similar to the address of a house. We know that every house in this world has to have a unique address. Similarly, every website has to have a unique domain name in the world of internet.
E.g : www.microsoft.com, www.pcaddons.blogspot.com, www.download.com etc etc.
Domain names such as .com, .net, .org can be bought at domain registration sites such as GoDaddy etc for less than $20 per year. If you need a domain for free then you get them at co.cc and co.nr. These services are my recommendations only. You are free to get a domain wherever you want.
2. Web hosting - Secondly one should have some web space allotted to his site. Web hosting is nothing but some space like 250 mb, 1 GB etc to store the contents, photos, videos that you post on your website. Also you have to allocate some bandwidth to make visitors come to your site without any problem. Today we have web hosting companies offering both disk space & also bandwidth for your site at reasonable prices. Some web hosting companies are also offering their basic hosting services for free. Here are my recommended Web hosting services
a. Paid Hosting services :
- Blue Host : Starting at $6.95 per month.
- Jumpline
: Starting at $7.95 per month.
- iX Webhosting.
: Starting at $4.95 per month.
- Webhostingpad
: Starting at $3.96 per month.
b. Free Webhosting :
- 000Webhost : Free hosting with 1500mb diskspace and 100GB traffic.
- Freehostia : Free hosting with 250mb disk space and 6GB monthly traffic.
3. Website maintenance - We can use free content management services (cms) like Wordpress, Mambo, Joomla and Drupal to create and edit articles on our website. In this tutorial of creating website,I mainly focus on creating websites with Joomla and Wordpress.
To start your website go and buy a domain or get free domain name (See above). Also signup with a webhosting company (See above). Tomorrow we'll see how to start creating website. Till then Good Bye!
Like this post, then please subscribe here. You can also subscribe through email, so that these posts are directly mailed to your inbox. Any comments and suggestions on this topic are always welcome.
NOD32 Smart Security is a complete protection suite offered by Eset. Eset Smart security protects you from all major online threats. It provides protection against virus, spyware, key-logger, dialers, trojans, adware, rootkits and hackers. Normally Eset provides 30 day trial version only but now we gonna see how to get NOD32 Smart Security 101 days free through a coupon code.
1. Click here to go to Eset U.K site.
2. Start filling the form from the line which says Where did you hear about NOD32? Enter your email ID and confirm it. Chose product as Eset Smart Security from the drop down. Enter CSHOP promotion code. See the image below.

3. Submit the form.
You will receive email from Eset U.K which contains a validation link. Click on that link and in the next page you'll be given NOD32 Smart Security username and password, note them down NOD32 Smart security 32bit & 64bit. During installation give the username & password you got and enjoy NOD32 Smart security free for 101 days.
Belated New Year wishes to one and all!
Like this post, then please subscribe here. You can also subscribe through email, so that these posts are directly mailed to your inbox. Any comments and suggestions on this topic are always welcome.


