Yesterday we've seen how to get a free domain name and free web-hosting. I continue this tutorial by assuming that you've signed up to CO.CC as your domain name and 000Webhost for your web-hosting. Today we will see how to setup the server settings of your web-host onto your domain. To add server settings on your domain follow the following steps :
Step1 : Giving your domain name to the web-hosting service.
1. Sign into your 000Webhost members account from here (If you don't an account signup here).
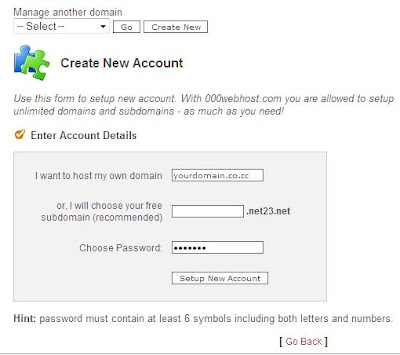
2. Click on create new.

3. Now in the next page enter your domain name that you've created, such as yourdomain.co.cc. Give a password and click on Setup new account tab.

In this way you can successfully setup your domain name on your web host.
Step2 : Add web-hosting server details onto your domain service.
1. Sign into your CO.CC account (If you don't an account signup here).
2. After signing in you will be shown the domain name which you registered earlier. Now click on that domain and click on Setup tab.
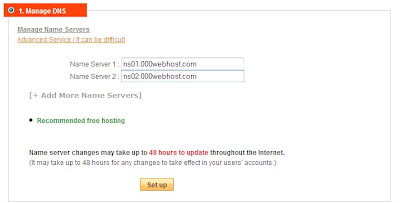
3. Now select the tab Manage DNS, Now enter these two sever names
ns01.000webhost.com
ns02.000webhost.com
into the dialog boxes Name server 1 and Name server 2 one by one. After entering the sever names click on Setup tab below. The settings will be saved and wait for 48 hours to ensure that the server settings of your web-hosting will be saved correctly.

That's it for today. Now wait until tomorrow and in between also check whether your domain is set properly by typing your domain name in web browser. Tomorrow we'll see how to make your site ready to publish your ideas.
Like this post, then please subscribe here. You can also subscribe through email, so that these posts are directly mailed to your inbox. Any comments and suggestions on this topic are always welcome.


0 comments
Post a Comment